Showing posts with label woodworking. Show all posts

Wednesday, 13 November 2024

WW: Stick vise

(As a warm-up for building myself a new radio, I put this together. It's for securing a printed circuit board while soldering in the components. Dozens of other gadgets accomplish this – I own at least three besides – but this design has the advantage of holding the work so low that the builder can steady his or her wrist on the bench while applying the solder iron. Very useful when populating small, crowded PCBs.)

Appearing also on My Corner of the World.

Wednesday, 20 March 2024

WW: Spring blessing


(Pieris japonica, known here as popcorn bush, is a popular landscaping shrub on the North Pacific Coast. Native to the same latitudes on the far side of the ocean, where climate and soil types are about identical, I'm told it fills whole ravines in Japanese forests. This must be brilliant to see, given its heady fragrance and dense sprays of sparkler-bright blossoms.

The early-spring show, and the fact that we had one at every house I can remember – always right by the front door – made this a favourite flower from early childhood. It's also a good carving and turning wood, fairly soft and light but fine-grained, taking an oil finish well; properties apparently unknown outside of Asia, given the absence of mention online, at least in any of my languages.)


Appearing also on My Corner of the World.

Wednesday, 24 February 2021

WW: Walking stick


(I've posted about my monk stick before, but there's no denying it has a very "rural" vibe. Ideal for forest and field, but rather too "Lord of the Rings" for road and town. That needs something shorter, and probably without a berry hook.

Hence the above. It's about sternum-height and is made from a nice piece of evergreen huckleberry [Vaccinium ovatum]. Though somewhat heavy for a walking stick, it's a hard, fine-grained wood, resistant to abuse, and oiling to a satiny deep gold lustre. A brass pipe cap - invisible under the snow - serves as a ferrule.

I've gotten used to the heft of the thing, and received some nice comments.)

Appearing also on My Corner of the World.

Wednesday, 6 May 2020

WW: The stain of the past


(I've never been a stain guy. I don't know why; boatbuilders just tend to prefer oil or varnish. If we deny ourselves the natural beauty of the wood, we opt for full-on paint.

But my mom needed an amendment to a piece of furniture, and this was the only way to get it into the ballpark, finish-wise. So I bought a likely can and set up to practice before pitching in to her project.

Above is my turntable platform. It's just an off-cut of cheap Canadian plywood, glued up from truffula trees or some damn thing. Since I've been using it unfinished, I thought, "Beauty, eh?"

But the instant I laid down the colour, the 1970s - stained era if ever there was one - jumped out and started doing the Hustle. And a torrent of PTSD flashbacks came, well... flashing back.

If I'd'a known my turntable would end up like this, I'd'a bought some Chicago to play on it.

oo-oo-OO-oo-no, baby, please don't go.)

Wednesday, 18 December 2019

WW: Workbench


(Last month I knocked this together, my opening salvo in a bid to carve out a modest workshop in my mom's tiny, cluttered garage.

Bench-building is one of those outwardly simple pursuits that amounts to a lot more than meets the eye. To begin with, the job always turns out to be more complex than one assumes, even with lines and lumber this primitive.

But even on a deeper level, there's just something revitalising about providing oneself the basis to build things. Any maker will tell you that a good bench is really a ship of war. From this platform I will execute brilliant feats of resourcefulness.

Or at least I will when I've refurbished my dad's old vise. [Stay tuned.])

Wednesday, 7 March 2018

WW: Morse code key

(After ten years fighting off my ham radio addiction, I recently dug out my old station and set it up again.

This is my classic brass straight key, the one I first used to get on the air.

Been in storage for a decade. I've missed it.)

Wednesday, 26 April 2017

WW: Drum log


(A hemlock recently fell across the trail and was cleared by someone with a chainsaw. Seeing the sections on the shoulder I felt a distinct uptick in heart rate; my dad taught me to call this a drum log, for the simple reason that you make a drum from it. This is a good one, too: two feet in diameter, well-rotted within and perfectly sound without. You thin this shell out with a chisel and even it up, then lace rawhide heads across both ends, and Bob's your uncle.

The remains of a large yellow jacket nest that occupied the cavity were also strewn about.)

Thursday, 15 September 2016

Hermitcraft: Hawthorn

(Some of this information originally appeared in my book, The Neighborhood Forager, Chelsea Green, 2000)

The neck of the woods where I've been staying has the most fabulous hawthorns (Crataegus) I've ever seen. In this harvest season they're as red as they are green, their branches clustered with fat crimson haws the size of small grapes. One is sorely tempted to put up a batch of jelly. (The fact that the same district is full of beautiful crabapples – the other ingredient, along with sugar, for perfect preserves – only makes it worse.)

Overlooked today, haws have a long history of culinary use. Most are fairly insipid when eaten raw, but their vibrant colour – red usually; sometimes yellow, orange, or purple – makes for visually stunning jams, jellies, and wines. Traditionally you run them with something else, such as crabapples, blackberries, sorbs (rowan berries), or sumac, that has better flavour. In a pinch you can simply add a teaspoon of lemon juice.

In times past, haws were pitched into a run of cider to give it body and a crimson sheen. Their association with apples, to which they are closely related, and with which they come ripe each year, also extends to use in apple pies and pastries, again largely for colour. (I suspect the reason the haws here-around are so big and beautiful is because they've cross-pollinated with the many apple trees in the area.)

Hawthorn itself is hard and strong, sands and oils well, and makes a fine walking stick, if a bit heavy. When I lived in Québec, where I did a lot of snowshoeing, I carried a long hawthorn walking stick that I could easily drive through snow and ice to probe for ground level, and which handily bore my entire weight when necessary, as it frequently was when climbing over obstacles or getting out of a tight spot. A hawthorn stick also tends to writhe and twist right and left, which gives it a poetical look and affords multiple varied handholds. (Again, I'm thinking of the hard winter service mine did.)

The same wood is useful for tool handles and mallet heads, and in fact any application requiring durable, inflexible service.

I've also pruned off the thorns of long-spined varieties, dried them steel-hard, and used them in cork and cardboard for thumbtacks and map pins. Dimensions vary tremendously from strain to strain, from short and fairly blunt through long and hypodermic. This is something to be aware of when scouting a hawthorn, both for the potential practicality and self-preservation.

If you've got hawthorns around (and thanks to the birds, you almost certainly have hawthorns around), and the fruit looks serviceable, try putting up a few jars of haw jelly. Its appearance alone is worth the effort.


Wednesday, 29 June 2016

WW: Sawbuck


(I recently reckoned I've built at least seven of these over my lifetime – possibly more. All made from scrap that would have been firewood itself if I hadn't pulled it off the woodpile or high tide line and turned it to generate more firewood.

Such a basic device. Worth no money; indispensable in real wealth.

Once, while moving from one home, I wrote in my journal: "Today I burned the sawbuck."

The depth of those words is difficult to sound.)

Thursday, 30 July 2015

Hermits Arrive


So I'm doodling around on the Enlightenment Superpath, and I surf into Arvesund, a Swedish company that makes prefab outbuildings. I browse through attractive garden sheds, summer cabins, sauna houses, and the odd lusthus, when suddenly I discover their Eremitens koja: a purpose-designed, so-designated hermit hut, from the drawing table of architect Mats Theselius!

My price inquiry to the company has gone unanswered, but another firm sells a kit to these lines, made entirely of recycled wood, for 96 500 Swedish kronor (about $11,300 Yank, at current rates). Models with new-wood exteriors sell for 79 500 SEK ($9,300 US); new wood overall for 67 500 SEK ($7,900US).

This is not the kind of money a hermit carries around; I could build at least eight such cabins for the cost of that lowest-price model. (Four, with woodstoves.) But I gotta hand it to the designer: he gets it. If it's true that some of the serving suggestions in Arvesund's literature are a bit, shall we say, spiritually encumbered, the dimensions and basic accommodations are entirely on-spec. This is indeed "just enough". Good on ya, Mats!

But the mere existence of this product raises a burning question: are we hermits becoming that thing that all populations must be to have legitimacy in the Red Dust World: a market? Will those glossy up-market magazines that pass for the Buddhist press soon be carrying adverts for elegant artisanal Japanese rice kettles and fair-trade rushlights made by Indonesian villagers?

Estimated Category of Risk: NBL.


(Photographs courtesy of Arvesund; front view located on Materialicious.com; interior and side view courtesy of Poppytalk.com; specs courtesy of SW Byggritningar AB.)

Wednesday, 1 April 2015

WW: The well-armed eight-year-old

(I built this toy gun when I was in Grade 2, nearly 50 years ago. Only a Scottish kid arms himself with a flintlock.)

Thursday, 19 June 2014

Hut Lust

You know when you're researching a blog article and then you run across something entirely unrelated thanks to Google's arcane search algorithms, but it's so awesome you stop writing about that other thing and write about this one instead?

I love that.

Some time ago I wrote a post about suitable shelters for forest practice. Now I find that some scholarship into that subject has already been done, thanks to interest in Kamo no Chômei. Buddhist hermit of indeterminate lineage, Chômei is most famous for his essay Hôjôki (方丈記), or The Ten Foot Square Hut. And you'll never guess what that essay is about.

To this day there's a certain amount of fascination with his accommodations among fans. Very few of whom, interestingly, are in the English-speaking world. That the most complete and succinct source I could find was Japanese is perhaps not so surprising, but even the runners-up were German and Hungarian. (One wonders if their appreciation of Chômei might be insight into their cultures.)

Anyway, having perused these blueprints in three languages, I'm prepared to certify them. Chômei's hut looks entirely serviceable, without being excessive, and a fitting counterpart to the similar cribs of Ryokan, Issa, and Thoreau.

Perhaps the man himself put it best:
But in this little impermanent hut of mine all is calm and there is nothing to fear. It may be small, but there is room to sleep at night, and to sit down in the day-time, so that for one person there is no inconvenience. […] If one knows himself and knows what the world is he will merely wish for quiet and be pleased when he has nothing to grieve about, wanting nothing and caring for nobody.


UPDATE, 21 June 2014: A reader directed me to this excellent video tour of Kamo no Chômei's hut. Check it out!


(Photo of Kamo no Chômei's preserved hut by David Dorsey; diagrams by アトリエかわしろ一級建築士事務所 and Carpe Diem Teaház.)

Thursday, 22 May 2014

Shipbuilding

Los Angeles, California. Constructive Hobby Recreation - NARA - 532247 I was about nine when my dad took me to visit a friend who was building a large wooden steamboat. It was all framed in, and really impressive. Giant ribs, each pair cut to unique curvatures, fitted into the keel at precise tolerances; each structural member crafted out of a specific wood for that part of the ship. It was a true work of art.

I asked my dad how they did that, and he said, "They study all their lives. Just learning how to read the plans is a significant accomplishment." And then he said something that's stuck with me: "Imagine: it took these guys a lifetime to learn how to build boats, and a year to get this far on this one, but you and I could pick up an axe and a sledge hammer and completely destroy it in minutes with no training at all."

I think about that when people admire military prowess, or consider torture an "art", or are proud of their ability to shoot holes in others' theories. It's a very cheap skill.

Show me what you've built.


(Photo courtesy of Rondal Partridge, Federal Security Agency - National Youth Administration, and Wikimedia Commons.)

Thursday, 5 September 2013

Hermitcraft: Shelters For Forest Practice

The interior of Thoreaus original cabin replica, Walden Pond

Thoreau's cabin at Walden
My decision to live in a tiny tent during my 100 Days on the Mountain, rather than more comfortable quarters, was largely influenced by my determination to live in the forest, rather than just near it. (It was also my only option when I thought I'd have to sit on public land.) But in the doing I discovered that a cabin is necessary to do this right; it spares you practice-robbing work and health risks. Let's be clear: by "cabin", I mean 
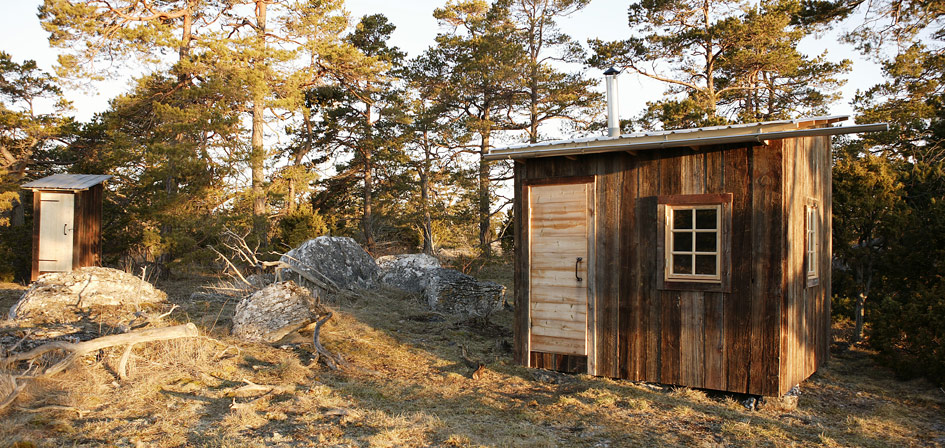
four walls and a roof. A shepherd's trailer; a wall tent; a tool shed; a plywood hut; eight by twelve of simple headroom. More, and you're no longer in the woods.

• Your shelter should have as many windows as possible, for morale and to keep you "in-frame". A broad, wrap-around opening in the walls, screened and shuttered, is perfect. A roofed porch or awning is also useful.

• As I learned, a woodstove can be invaluable in northern climes, even in summer. Otherwise it can be impossible to stay clean; you can't dry your clothes and it's difficult to bathe through cold and rainy weeks. The small portable models they make for hunters are fine.

Shepherd's trailers
• Since cooking on a woodstove is an arcane skill, uncomfortable in warm weather and time-consuming, you'll need a camp stove as well. A single propane or butane burner is entirely adequate and can be used indoors with adequate ventilation.

• Take pains to secure a comfortable cot and a good pillow; unbroken sleep is vital to effective practice.

• You will also need a table and chair. Lack of comfortable seating is a technique governments use to torture prisoners. They do not become enlightened. (Mandarin or convict.)

• Install shelves or cabinets, and a variety of hooks, for storage.

Simple garden shed
A corrugated metal roof and/or sides makes for a fast and solid building, fine for one-season use. A corrugated plastic roof, light to carry and cheap to buy, also acts as a skylight. A wood floor, while not necessary, makes staying clean a lot easier. (If using a tent, consider a plywood platform, a sewn-in floor, or at least a heavy canvas ground cloth.)

Finally, it's a good idea to make whatever structure you choose as neat as possible. People are already suspicious of us. You don't want to give those Ted Kaczynski references any free hand.

Basically, you want something that's dirt-basic but a whole lot cleaner. Then raise the Bandana Ensign in the dooryard and bust some suffering!

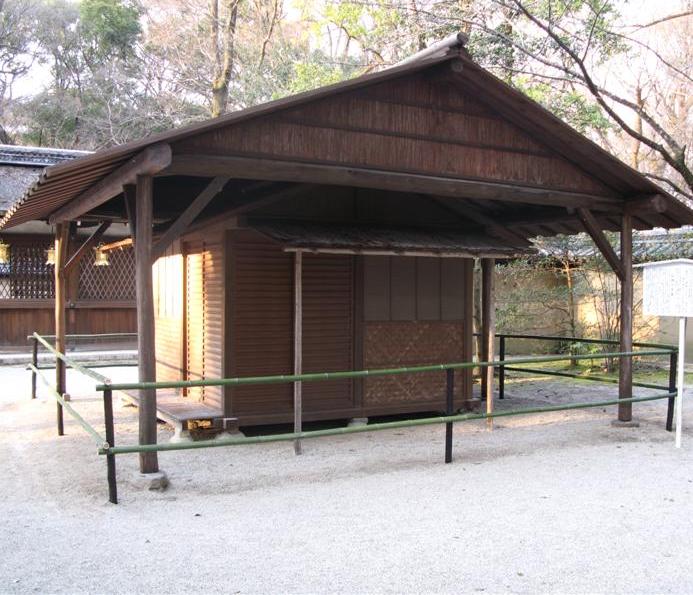
UPDATE, 19 June 2014: see my post on Kamo no Chômei's classic hermit hut.

UPDATE, 30 July 2015: Swedish architect draws designer hermit digs! Read about it here.

(Adapted from 100 Days on the Mountain, copyright RK Henderson. Photos: Thoreau's cabin (Tom Stohlman) and shepherd's trailers (John Shortland) courtesy of Wikimedia Commons; simple garden shed from Sheddiy.com.)

Thursday, 5 May 2011

Update: Ferns, Sticks, Trinity Tar

Here's some breaking news on subjects I've broached in the past, of no particular internal relevance and in no particular order.

Fiddleheads

In Hermitcraft: Fiddleheads I discussed the differences between Pteridium (bracken) shoots and those of other ferns, such as those pictured in the article. Here then is a photo of one such Pteridium shoot, for those who want to taste (or avoid) them. (Click to enlarge.) Where they occur, they typically occur en masse; one spring I took a walk during a 10 minute break in a community college course I was teaching, and came back with a mighty fistful of these.

Walking Stick

In A Brief History of the Stick I mentioned that I'd whipped the end of my walking stick and coated the cord with PVC cement. It didn't work, though it probably would have if I'd used urethane varnish. (The glue was an experiment.) I've since stripped off the whipping and replaced it with this brass plumbing fitting from the hardware store. The balance of the stick has changed a bit, but all in all it's working very nicely.

Friday, 29 April 2011

"Pioneers all we are bound/To root-hog or die on the Sound"

I had a lot of fun building this structure, which is about a foot and a half long by a little less wide. It encloses an electrical riser at the zendo. Any Old Settler will instantly know it for a split shack, also known as a slab (or slap) shack, or shotgun shack. It's what we lived in before there were trailers.

At its most elemental, the split shack is pole-framed, eight feet by ten, and sided in "splits," rough cedar boards froed directly off the log without benefit of saw. These were free for the taking, especially if you lived on the bay. Where nails were scarce you could knock it up with whittled pegs and an auger, or notch the splits and sew it together with rope, First Nations style. (This is basically just a hillbilly longhouse, anyway.)

Because splits come away thicker at the bottom than the top they impose slightly asymmetrical lines on the whole, for a touch of whimsy, as if brownies lived inside, or maybe hobbits.

Cabins of this lineage also usually had at least one window, in front, opposite the front door. If there was no glass, it was "glazed" with greased rawhide or paper and protected by a wooden shutter. Even glass windows were as likely to be bottle bottoms as plate.

I believe the various names originally referred to different cabins, though they're used interchangeably now. The derivation of "split shack" is obvious, but "slabs" were the round sides of logs ripped off by the head saw as they were squared for milling. As a waste product, slabs were cheap or free; in my day, it was common for families to order up a truckload from the local mill and make one of the kids (I'll call him "Robin") buck them for firewood. I'd bet even money that a true "slab shack" was sided with those instead of splits, and that the term "slap shack," as in something just "slapped up", is just a mutation.

As for "shotgun shack," I know why it's called that (because the front and back door are sited in such a way that you can fire a shotgun straight through without hitting anything), but I have no idea why it's a selling point. Seems a better plan would be not to shoot at the house in the first place.

By the way, the gravel this enclosure is bedded on came from the very beach I grew up on. By purest coincidence, there was a bucketful of this in the house, left over from a large philodendron my grandparents brought with them from the bay. This finally died during the years the house was locked up, and when I liquidated the remains, I kept the gravel the pot was lined with, just in case. The decision to put the two together made itself.

And it really wants a stove pipe. The oversight just glares. But the thing's supposed to be unobtrusive, and not attract attention to itself, so I didn't put one on. But it took all my determination.

Because it ain't home until it has one.

Thursday, 14 April 2011

Hermitcraft: Ancestor Gong

This is an ancestor gong I made from an old saw blade I found in my grandfather's shop. Each time you ring it, it sings gratitude for those who went before and made this life possible. Starting with my grandparents, who built the house I'm living in.

The blade sings nicely (I chose the best ringer in the lot), and gongs of this type have deep meaning for Old Settlers; time was, all the muddy, isolated villages on the Green Side had a big, worn-out head saw blade hanging in the square, along with some random piece of busted ironmongery to beat on it. That's how you got people's attention for announcements, fires, celebrations, and so on. Where there was no church bell, it called folks to that, too.

The symbolism in this particular blade goes even deeper, as my grandfather, his roots gnarled deep in this glacial till, was a congenital, nay compulsive, woodworker and builder. With this very blade he put the roof over me and the walls around. So with each stroke, this gong pays homage to all my people, conceptual and concrete.

The striker is a piece of hawthorn I cut on the property. The photo at right shows what it looks like now. This was originally finished in classic trinity tar (linseed oil, turpentine, and vinegar), but that mildewed in the rain. So I took the beater back down, sanded off the first finish and re-tarred it, this time with linseed oil, paint thinner, and vinegar, with half a part of asphalt to darken it up. I like the result, and after about two dozen coats of that toxic, no-more-mister-nice-guy tar, well-rubbed and hardened over the woodstove for a month or so, it's looking good out there.

The lanyard is six strand kongo kumihimo: four strands of tarred seine twine, two of gold mason line.

I try to ring this gong every day at noon. I give it one han roll-down, striving for perfect symmetry and tone. It's become part of my mindfulness practice.

Update, 5 November, 2011: It turns out that the saw blade eventually loses the ability to ring in this climate, evidently because of the heavy coat of rust it acquires. Today I replaced the original blade with another from my grandfather's pile, but it too will gradually grow duller. It would be fine for an indoor chime, though.

Saturday, 29 January 2011

Hermitcraft: Trinity Tar

(I mentioned this stuff last time, and since it's a handy thing to have around, here are the particulars for anyone who'd like them.)

Trinity tar has been around forever. It's the West's original varnish, our equivalent of Asia's lacquer and t'ung oil. And unlike a lot of pre-industrial standbys, it can still be whipped up from ingredients found in any hardware store. You may even have them sitting around the house right now.

Everybody ready? Sharpen your pencils and listen carefully, cos here it comes:

1 part boiled linseed oil
1 part gum turpentine
1 part white vinegar

Method:

1. Pour ingredients into a tightly-lidded container.
2. Shake

Shhhhh. Don't tell anybody.

Yeah, that's all there is. The chemistry works like this: linseed oil cures with exposure to oxygen, into a hardish, satiny, impermeable surface. Boiled linseed oil (which in our day is really chemically treated) dries much faster than raw. Turpentine thins it up to penetrate more deeply. Vinegar contradicts the oil's natural tendency to mildew.

The proportions can be altered according to taste and application. When used to finish furniture (an excellent idea, by the way), the vinegar is sometimes omitted, since the expected environment is dry. But at least half the reason to use this stuff is its smell, very homey and aromatic and unpetrochemical, so I always add vinegar for the bouquet. Hey, you can never have too much (medically benign) antifungal.

And the fact is that in its traditional form, trinity tar is about as inoffensive as it gets. If made with raw oil instead of boiled, you could even use it as vinaigrette, which it closely resembles in the jar. In fact, I'm told veterinarians once used the same philtre to treat constipation and colic.

Users have developed their own tweaks on the formula to need. Sometimes a measure of commercial varnish is added to get a faster, harder finish. (Generally half a part or less, in my experience.) For outdoor use I replace the gum turpentine with paint thinner to give the mix even more antifungal kick, and may add a touch of roofing tar as well, to darken it up. (See photos of some of these projects here.) This is, after all, the Urpaint; pretty much all paint started as trinity tar with added colorant.

Application is simple. After sanding the wood, lay on a thick coat of trinity tar. I usually apply the first coat with a brush, to get as much on as possible. Then leave the piece alone for an hour or so, or until most of the oil has been absorbed, and repeat. (This can happen once, or go on for a day, depending on what kind of wood you're working with.) When the oil no longer disappears quickly, rub that final application well into the wood with a soft cloth, until evenly distributed and no slicks remain. Leave the piece to dry overnight. (Faster if set near the woodstove.) You can repeat this step ad infinitum, deeping the finish each time, but never leave wet oil on the surface of the wood; it will coagulate into a dirty, gummy mess.

As this is an emulsion (an uneasy alliance of oil and water; remember the salad dressing?), it needs shaking up a bit during work to stop it separating.

In a matter of weeks the finish will oxidise to a pleasing honey colour, and continue to smell great when it warms, as when the sun streams in or you handle it. The finish can be updated occasionally by a good wiping down with straight turpentine, then reapplying as before. To remove it entirely, either sand the piece lightly or scrub well with naphtha.

In its purest form, this concoction will neither offend chemical sensitivities nor provoke same in habitual users, and will impart to any room a memorable "Grandpa's house" glow and smell, at least if you come from country people. Let me know if you innovate on the recipe; it's all about the experience.